Introduction to Reusable Sticker Books
Are you looking to unleash your creativity while keeping things organized? Reusable sticker books might just be the perfect solution for you! These innovative and fun tools allow everyone, kids and adults alike, to express themselves without the clutter of traditional stickers. Imagine a world where you can mix, match, and rearrange stickers as often as you like, all in one handy book. Whether you’re an avid crafter or simply want to add some flair to your notes, reusable sticker books offer endless possibilities. Let’s dive into how you can create your very own reusable sticker book that sparks joy and inspiration!
Benefits of Using Reusable Sticker Books
Reusable sticker books offer a treasure trove of benefits that make them an excellent choice for creative minds. One major advantage is their eco-friendliness. By using reusable materials, you reduce waste and contribute to a healthier planet.
These books also spark creativity in both kids and adults. The ability to rearrange stickers encourages imaginative play and storytelling. It’s like having an ever-changing canvas at your fingertips.
Organization is another key benefit. A dedicated space for stickers helps keep things tidy and makes finding the perfect design easy.
Furthermore, they provide hours of entertainment without breaking the bank. Once you have your sticker book set up, there’s no need for constant repurchasing—just mix it up with different designs as you go!
Whether for art projects or simple fun, reusable sticker books are versatile tools that can cater to various interests while fostering creativity and organization.
Materials Needed for Creating a Reusable Sticker Book
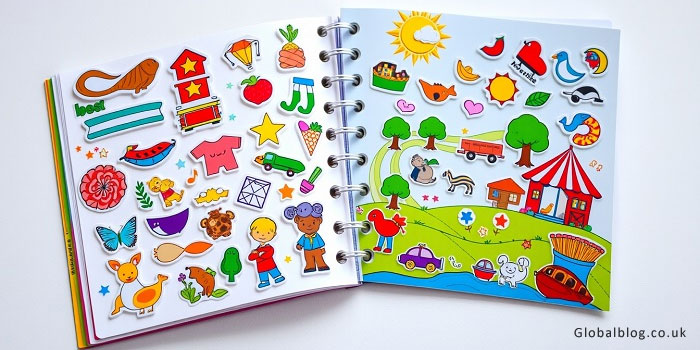
Creating a reusable sticker book is a fun and creative project that requires some essential materials. First, you’ll need a sturdy notebook or binder. Choosing one with plastic sleeves can make it easier to swap stickers in and out.
Next up are the stickers themselves. Gather various designs—these could be store-bought or homemade. Look for removable adhesive options so they don’t damage your pages.
You may also want to include markers, colored pencils, or decorative washi tape for embellishing your pages. These will help personalize your design.
Don’t forget about scissors and possibly a paper cutter if you’re making custom-sized stickers! A clear protective cover can keep everything tidy while adding durability to your creation.
Consider storage solutions like small bins or boxes to keep extra stickers organized and easily accessible whenever inspiration strikes.

Step 1: Choosing the Right Notebook or Binder
Selecting the ideal notebook or binder is crucial for your reusable sticker book journey. Think about the size that suits you best. A larger format offers ample space for creativity, while a compact one is easier to carry around.
Consider the binding type as well. Spiral-bound notebooks lay flat, which makes it easy to apply stickers and flip through pages seamlessly. On the other hand, binders allow you to add or remove sheets whenever necessary.
Material matters too; opt for sturdy covers that can withstand daily use. Look for options with plastic sleeves if you want extra protection for your designs.
Don’t forget about aesthetics! Choose colors and patterns that resonate with your style. This will make using your reusable sticker book even more enjoyable each time you dive into it.
Step 2: Preparing the Pages for Stickers
Preparing the pages for your reusable sticker book is an exciting step. Start by selecting the right type of paper or plastic sleeves that are easy to clean and can withstand frequent use.
Consider using laminated sheets. They provide a smooth surface, making it simple to peel off stickers without leaving residue behind. If you prefer a more traditional approach, thick cardstock works well too. Just ensure it’s sturdy enough to handle repeated applications.
Next, create designated sections within each page for different themes or categories of stickers. You might want one section for animals, another for nature scenes, and so on. This organization will not only make finding stickers easier but also enhance your creative process as you build scenes or stories.
Be mindful about leaving some blank spaces around the edges for doodling or adding notes later on! Prepare those pages with care; they’ll be the canvases where your imagination comes alive.
Step 3: Organizing and Sorting Your Stickers
Organizing your stickers can be a fun and creative process. Start by gathering all the stickers you have, whether they are new or used. Lay them out on a flat surface to get an overview.
Next, sort them into categories that make sense for you. You might group by theme, color, size, or even occasion. This way, finding the right sticker later becomes much easier.
Consider using small containers or envelopes for each category. Labeling these will help keep everything tidy and accessible. If you have lots of tiny stickers, clear pockets in a binder can also work wonders.
As you organize, think about what combinations excite your imagination. Mixing different types can lead to fresh designs later on when you’re ready to create pages in your reusable sticker book!
Step 4: Designing and Decorating Your Pages
Designing your pages is where creativity truly shines. Begin by selecting a theme that speaks to you. It could be seasonal, whimsical, or even educational.
Use colored markers, washi tape, or patterned paper to add flair and make each page visually appealing. Think about incorporating borders around areas where stickers will go; this adds structure while enhancing the overall look.
Consider adding labels for different sections in your book. This helps with organization and makes it easier to find specific stickers when you need them.
You can also include journaling spots or prompts next to your stickers. This encourages storytelling and offers an interactive experience every time you flip through the book.
Remember, there are no rules, let your imagination take the lead! Every design choice reflects your personality and style, making each page uniquely yours.
Step 5: Using and Reusing Your Stickers
Using your reusable stickers is where the fun truly begins. Start by selecting a page that complements your theme or current mood. The versatility of these stickers allows you to create endless designs.
When placing a sticker, carefully peel it off its backing and gently press it onto the desired spot. If you’re not satisfied with the placement, simply lift and reposition it. This flexibility means every design can be unique each time!
After enjoying your creation for a while, feel free to remove stickers without any damage to the page or sticker itself. Clean them with a damp cloth if they lose their stickiness over time; this often revives them for continued use.
Engage friends in creating new scenes together! Sharing ideas can spark creativity and lead to exciting collaborative designs on your pages. Embrace the joy of reimagining stories through these colorful adhesive companions.
Conclusion: Reusable Sticker Books
Reusable sticker books offer a delightful way to unleash creativity while promoting sustainability. They serve not just as an artistic outlet but also as an organized means for storing and displaying stickers. The benefits are clear: from saving money on disposable products to providing endless fun for kids and adults alike.
So why wait? Dive into the world of reusable sticker books today! Whether you’re crafting with children or indulging your own artistic side, this project promises joy with every peel-and-stick adventure. Embrace the magic that comes from creating something uniquely yours, a keepsake that evolves over time without adding waste to our planet.
